
Create Creatine Gummies at Home The Ultimate Guide
Thinking about making your own creatine gummies at home? There’s a good reason for it. When you make your own, you get total control over the ingredients, you save some cash, and you finally get a tasty alternative to those clumpy powders. It’s a simple kitchen project that pays off big for your fitness routine.
Why Bother Making Your Own Creatine Gummies?
Before you start pulling out ingredients, let's talk about why so many people are skipping the pre-made stuff and going the DIY route. The biggest reason? You get complete control over what you consume.
Commercial supplements are often packed with things you don't want, like weird fillers, artificial sweeteners like sucralose, or sugar alcohols that can mess with your stomach. When you're the one in charge, you pick everything—from the gelatin down to the sweetener.
This control is a game-changer if you have specific dietary needs. You can easily whip up a batch that fits your lifestyle perfectly:
- Keto-Friendly: Just use a sugar-free sweetener like stevia or monk fruit.
- Vegan: Swap out the standard beef gelatin for a plant-based option like agar-agar.
- Clean-Label: Stick with simple, whole-food ingredients like real fruit juice and top-notch creatine monohydrate.
The Rise of a Tastier Alternative
Let's face it, nobody enjoys choking down gritty creatine powder in a glass of water. It's a chore. Gummies turn that daily task into a treat you actually look forward to.
This isn't just a small trend, either. The global market for creatine gummies was valued at $45.1 million and is expected to blow up to $168.2 million by 2032. That kind of growth tells you people are serious about wanting supplements that are easier and more enjoyable to take.
Beyond the great taste, making them yourself is surprisingly budget-friendly. A single tub of good creatine powder can yield several batches of gummies, costing you way less than what you’d pay for them in a store. You get the benefits without the brand-name markup.
The real win with a DIY approach is turning your supplement routine from a boring task into something you actually enjoy. You're not just taking creatine; you're taking something you made yourself, for your own goals.
Finally, there’s something empowering about the process. You get a much better handle on what you're putting into your body and can make sure every single gummy has a precise, consistent dose. For more on the benefits and different types of gummies, dive into our complete creatine gummies guide.
Assembling Your Ingredients and Tools

Before you even think about turning on the stove, let's get everything laid out. I can't stress this enough: having your ingredients and tools ready to go makes the whole process a breeze. Think of it like a mise en place for your supplements—it's your kitchen pre-workout routine.
First, the main event: creatine monohydrate. Don't just grab any tub off the shelf. For making gummies, you absolutely want to use a micronized powder. The finer grind helps it dissolve much more completely, which is the secret to avoiding that unpleasant, gritty texture that can ruin a batch. I also recommend sticking with brands that are third-party tested for purity.
Next, you need something to give your gummies that classic chewy bite. This is your gelling agent, and you’ve got a couple of solid options.
- Beef Gelatin: This is the go-to for most people. It creates that firm, satisfying chew you expect from a gummy. Always grab the unflavored kind so it doesn't clash with the flavors you'll be adding later.
- Agar-Agar Powder: If you're looking for a vegan-friendly option, agar-agar is your best bet. It's made from seaweed and works like a charm, but just a heads-up: the texture is a bit different. It's firmer and less bouncy than gelatin, so expect a slightly different mouthfeel.
Your Creatine Gummy Ingredient Checklist
To make things simple, here’s a quick rundown of the essential components. Getting these right is half the battle.
| Ingredient | What to Choose | Its Role in the Recipe |
|---|---|---|
| Creatine | Micronized Monohydrate Powder | The active ingredient. Micronized powder is crucial for a smooth texture. |
| Gelling Agent | Unflavored Beef Gelatin or Agar-Agar | This is what turns your liquid into a solid, chewy gummy. |
| Liquid Base | Water, 100% Fruit Juice, or a low-cal drink | Forms the body of the gummy and carries the flavor. |
| Flavoring | Sugar-Free Water Enhancers or Extracts | This is where you get creative and nail your favorite taste profile. |
| Sweetener | Stevia, Monk Fruit, or Erythritol | Optional, but helpful for balancing out tart flavors. |
Choosing quality here really pays off. A good micronized creatine and unflavored gelatin are non-negotiable for getting the texture and dosage just right.
The Supporting Cast of Ingredients
With your core components handled, it's time to have some fun with flavor. This is where you can really make the recipe your own.
You’ll need a liquid base—water is fine, but 100% fruit juice adds natural flavor and sweetness. One word of caution: steer clear of fresh pineapple, papaya, or kiwi juice. They contain enzymes that will actually break down the gelatin and prevent your gummies from setting. It's a frustrating mistake to make, so trust me on this one.
If your juice isn’t sweet enough, you can add a little extra. For a zero-calorie kick, a few drops of stevia or a sprinkle of monk fruit work great. If you don't mind a few carbs, a small amount of honey or maple syrup can add a nice depth of flavor.
Pro Tip: The quality of your ingredients directly translates to the quality of your gummies. If you use a gritty creatine powder, you'll get gritty gummies. It's as simple as that. Spend a little extra on the good stuff.
Essential Kitchen Equipment
You don’t need any fancy lab equipment for this. A few basic kitchen tools are all it takes to make the process clean and successful.
Here’s what you should have on hand:
- Silicone Molds: These are a must. They come in tons of shapes and sizes, but more importantly, their flexibility makes it super easy to pop the gummies out perfectly every time.
- Small Saucepan: A little non-stick saucepan is perfect for gently heating the liquid and dissolving all your powders without scorching them.
- Whisk: A small whisk is your best friend for preventing clumps. You’ll need it to get the gelatin and creatine fully incorporated for a smooth mix.
- Measuring Spoons and Cups: Dosing is everything. To make sure each gummy has the right amount of creatine, you need accurate measuring tools. Don't eyeball this part.
- Dropper or Small Spout Pitcher: Filling those tiny mold cavities without making a huge mess is tricky. A simple dropper (often included with molds) or a small measuring cup with a spout will make your life so much easier.
Your Foolproof Creatine Gummy Recipe
Alright, let's get into the fun part. With all your gear and ingredients ready to go, it's time to make some creatine gummies that actually taste good and get the job done. I'll walk you through it step-by-step, making it feel less like a chemistry experiment and more like a simple kitchen project. The goal is to get your first batch just right.
We'll tackle this in a few key stages. First, we'll prep the gelatin, which is crucial for the right texture. Then, we'll get the creatine and flavors mixed in smoothly before pouring everything into the molds to set.
Blooming the Gelatin Correctly
The absolute secret to getting that perfect, chewy gummy texture lies in "blooming" the gelatin. This just means you let the gelatin powder soak up cold liquid before you heat it. If you skip this, trust me, you'll end up with a lumpy, weirdly textured mess.
Pour your cold liquid base—whether it's water or fruit juice—into a small saucepan. Now, sprinkle the unflavored gelatin powder evenly across the surface. Don't just dump it in one pile! Let it sit there, untouched, for about 5-10 minutes. You'll see it start to wrinkle and absorb the liquid, which is exactly what you want.
Dissolving the Powders and Combining
Once your gelatin has bloomed and looks like a weird, wrinkly gel, it's time for a little heat. Put the saucepan on the stove over low heat. The idea here is just to warm the mixture enough to dissolve the gelatin—you never want it to boil. Boiling can mess with the gelatin's gelling power and isn't great for the creatine we're about to add.
Stir it constantly with a whisk until the liquid is totally smooth and clear. As soon as the gelatin is dissolved, take the pan off the heat. This is when you'll whisk in your micronized creatine monohydrate, your sweetener, and any liquid flavorings you're using.
Crucial Tip: Add the creatine after you take the pan off the heat. Creatine is pretty stable, but blasting it with direct, high heat can start to degrade it. A warm liquid is all you need to get it dissolved without risking its potency.
This simple infographic really nails the core workflow for making these gummies.
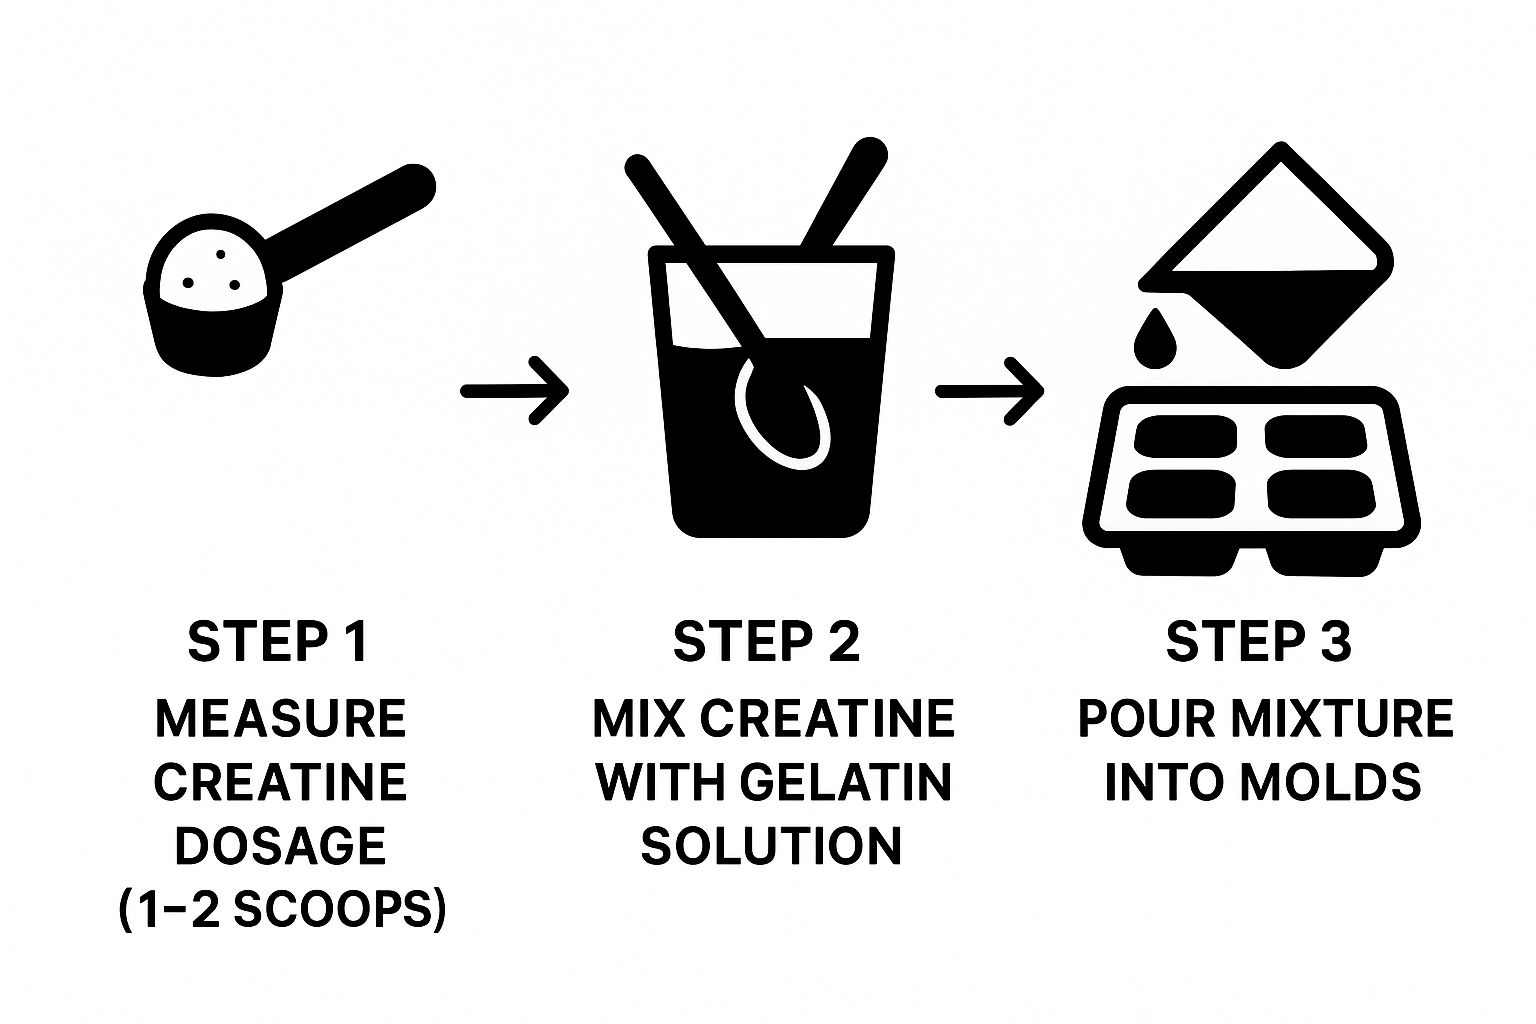
As you can see, it really just comes down to measuring, mixing, and molding. Get those three things right, and you’re golden.
Pouring and Setting Your Gummies
Now that your creatine mixture is ready, it's time to fill those molds. You'll want to work fairly quickly here. Use your dropper or a small spouted pitcher to carefully fill each little gummy cavity. If you see the creatine powder starting to settle at the bottom of the pan, just give it a quick whisk to mix it back in.
Once your molds are full, carefully move them into the refrigerator. They'll need at least 30-60 minutes to fully set, though I find leaving them for a couple of hours gives them the best, firmest texture.
This recipe is a great place to start. If you get really into this, you might even want to explore the principles of how to create a supplement formula from scratch to better understand how all the ingredients work together.
Ultimately, the great taste and pure convenience are why so many people are making the switch from powder. For a full breakdown of how the two stack up, don't miss our detailed comparison of creatine gummies vs powder. You’ve now got the basic process down
Customizing Flavors Like a Pro
Once you’ve nailed the basic recipe, the real fun begins. This is where you get to ditch the standard fruit punch and create creatine gummies you'll actually want to take every day. Think of the base recipe as your blank canvas.
The simplest way to start is by changing up your liquid. Instead of water, try using 100% fruit juice. Tart cherry juice is a fantastic choice, and some studies suggest it can even help with recovery. For a milder, sweeter base that plays well with other flavors, you can’t go wrong with a crisp apple or white grape juice.
Building Your Signature Taste
To take your gummies from good to great, you need to think beyond just one juice. The best flavors come from combining different elements, and you don’t need to be a professional chef to do it. Just think about flavors you already love.
Here are a few combinations I've had great success with:
- Zesty Citrus Blast: Use orange juice as your liquid and add a few drops of lemon or lime extract. It gives it a bright, clean kick.
- Spicy Mango Tango: Start with mango nectar or puree and stir in a tiny pinch of cayenne pepper. The subtle heat is an amazing contrast to the tropical sweetness.
- Cool Raspberry Mint: Use raspberry juice or a sugar-free flavoring. As you warm the liquid, let a mint tea bag steep in it for a few minutes. Just remember to pull the tea bag out before you add the gelatin!
The whole point is to make a flavor so enjoyable that you forget you're taking a supplement. Turning a daily chore into a treat is why this format is exploding in popularity.
This shift toward enjoyable supplements is a huge deal. The creatine market, currently valued at $639.7 million, is booming specifically because of convenient options like gummies. People want products that work but also fit seamlessly into their lives. For a deeper dive into these trends, check out the full report on the rise of creatine gummies on Meticulous Research.
Fine-Tuning Sweetness and Beyond
The fruit juice you choose will do most of the heavy lifting when it comes to sweetness. If your batch turns out a bit too tart for your liking, it's an easy fix. A few drops of liquid stevia or a teaspoon of monk fruit sweetener will balance things out without adding sugar.
You can also use this as a chance to sneak in other supplements. It’s a great way to consolidate your daily stack into a single, tasty bite.
Consider mixing in:
- Electrolyte Powder: Perfect for post-workout rehydration. Just make sure to add a little extra liquid to account for the added powder.
- BCAAs (Branched-Chain Amino Acids): An unflavored BCAA powder can be mixed right in with the creatine. Heads up, though—BCAAs can be a bit bitter, so you might need to dial up the flavoring or sweetener to mask it.
When you start adding extra powders, a good rule of thumb is to add about one extra tablespoon of liquid for every scoop of powder you put in. This keeps the mixture from getting too thick to pour and helps you create powerful gummies packed with everything you need.
Proper Storage and Accurate Dosing
Fantastic, you’ve made a batch of creatine gummies! Now comes the part that ensures all your hard work pays off: keeping them fresh and knowing exactly how much creatine you're taking.
Because these are homemade, they don't have the preservatives you'd find in store-bought candy. Your best bet is to pop them in an airtight container and store them in the refrigerator. This keeps them from getting sticky or mushy and they should stay good for about 7-10 days.
Extending Their Lifespan
Made a massive batch? No problem. The freezer is your friend for long-term storage.
- How to Freeze: Lay the gummies out on a baking sheet lined with parchment paper. Let them freeze solid for an hour or so. Once they're frozen, you can toss them all into a freezer-safe bag or container without them sticking together.
- How Long They Last: Frozen like this, your gummies will keep for up to 2-3 months. Just grab what you need a few minutes before your workout; they thaw out fast.
Calculating Your Dose for Accurate Results
This is arguably the most critical step. Getting your dosage right is the key to seeing real results from creatine, and it’s surprisingly easy to figure out. You just need to do a little math.
First, figure out the total amount of creatine you mixed into the entire batch. Let's say you used 20 scoops, and your creatine brand has 5 grams per scoop. That gives you a total of 100 grams of creatine.
Next, count up how many individual gummies you made. If your molds yielded 50 gummies, you have your second number.
Now, just divide the total creatine by the total number of gummies.
Example Calculation:
- Total Creatine in Recipe: 100 grams
- Total Gummies Produced: 50 gummies
- Calculation: 100g / 50 gummies = 2 grams of creatine per gummy
With this simple math, you know exactly how much you're consuming. If your daily target is 5 grams, you'd just eat two and a half gummies.
Knowing your exact intake is fundamental. We dive much deeper into this in our creatine dosage guide for beginners and experts. By mastering your storage and dosing, you can be confident that every gummy is helping you hit your goals.
What to Do When Your Gummies Go Wrong
So, you followed the recipe to the letter, but your creatine gummies came out… less than perfect. It happens to all of us. Don't throw in the towel just yet. Most gummy-making hiccups are surprisingly easy to fix once you pinpoint the culprit. Let's dig into the most common frustrations I've seen and get your next batch back on track.
The number one complaint I hear is about a gritty or clumpy texture. This almost always points to one of two things: the kind of creatine you're using or your mixing technique. For a silky-smooth gummy, you absolutely have to use a micronized creatine monohydrate. The particles are much finer, which helps them dissolve instead of just floating around.
Your mixing temperature matters, too. Make sure you're whisking the creatine into a liquid that's warm, but not boiling. This gives the powder its best shot at dissolving before the gelatin takes over.
Getting the Texture and Set Just Right
Are your gummies too soft and gooey, refusing to firm up? Or did they turn into super-tough, rubbery bricks? When the texture is off, the gelatin is almost always the problem.
- Problem: My gummies are too soft and won't set. This is the classic sign of improperly bloomed gelatin. You have to sprinkle the gelatin powder over a cold liquid and let it sit for 5-10 minutes before you even think about heating it. If you skip this, the gelatin simply won't have the power to gel correctly.
- Problem: My gummies are way too hard. This is an easy fix—you probably just used a bit too much gelatin for the amount of liquid. Next time, dial back the gelatin by about a quarter teaspoon. You'll be surprised what a difference it makes in getting that perfect, chewy bite.
Another common headache is finding all your precious creatine powder settled in a sad layer at the bottom of the gummies. This happens when the creatine falls out of the mixture before the gelatin has a chance to set. The key here is speed. As soon as you've combined all your ingredients, give the mixture one last, energetic whisk and pour it into your molds immediately.
Your goal is to get the mixture into the fridge as fast as possible. This lets the gelatin set before the heavier creatine particles can surrender to gravity and sink. A quick, confident pour is your best friend.
It's no surprise people are trying this at home. This kind of supplement innovation is part of a massive global trend. North America currently dominates the creatine gummy market, driven by a strong fitness culture. But Europe, particularly Germany and the UK, is catching up fast as more people prioritize their health. You can learn more about the global creatine gummy market dynamics on Meticulous Research.
Sidestepping Common Pitfalls
Before you start your next batch, let's cover a few other mistakes that can trip you up. I've learned these the hard way so you don't have to.
| The Mistake | How to Fix It |
|---|---|
| Using fresh pineapple or kiwi juice | These fruits contain enzymes that literally eat gelatin for lunch, destroying its ability to set. Stick with pasteurized juices like apple, grape, or berry. |
| Boiling your mixture | Don't do it! High heat can weaken the gelatin and may even degrade the creatine. You only need gentle, low heat to get the job done. |
| Skipping the "bloom" | I know I've said it before, but it's that important. Blooming the gelatin is the single most critical step for that perfect gummy texture. Never skip it! |
Once you understand these common issues, you can troubleshoot like a pro. A little bit of practice is all it takes to refine your technique and start making perfect creatine gummies every single time.
Got Questions? Let's Talk Creatine Gummies
When you start making your own supplements, you’re bound to have some questions. It’s all part of the process! I've been there, and I’ve compiled some answers to the most common things people ask when they first dive into making creatine gummies.
Which Juice Works Best?
This is probably the first question that comes to mind. You can use pretty much any fruit juice you like—apple, grape, and cherry are all fantastic choices.
There’s one major exception to keep in mind, though: avoid fresh juices from pineapple, kiwi, or papaya. These fruits contain an enzyme called protease that will literally digest the gelatin, meaning your gummies will never set. It’s a frustrating lesson to learn the hard way, so stick with pasteurized juices to be safe.
How Long Do They Last?
Your homemade gummies will stay fresh and potent for about 7-10 days if you keep them in an airtight container in the fridge.
If you make a big batch and want them to last longer, they freeze incredibly well. Just pop them in a freezer-safe bag, and they’ll be good for up to three months.
Help! My Gummies Are Gritty.
Ah, the gritty texture problem. This is a classic issue, and it almost always comes down to the creatine monohydrate not dissolving well.
The absolute best way to solve this is to use a micronized creatine monohydrate. The particles are much finer, so they suspend more evenly throughout the gummy mixture. This results in a noticeably smoother texture.
My biggest piece of advice: always add your creatine to a warm liquid base, never a boiling one. This gives it the best chance to dissolve without risking damage from high heat.
Is It Safe to Heat Creatine?
It's completely fine to heat creatine to the temperatures needed for making gummies. The key is gentle heat.
Creatine is pretty stable, but you should never let the mixture boil. Prolonged, high heat can start to break it down into creatinine, which is something you want to avoid. Just follow the recipe, keep the heat low, and you'll have perfect, effective gummies every time.
Tired of the prep work? Smash.com makes it easy to get your daily 5g of creatine with delicious, ready-to-eat gummies. Ditch the messy powders and enjoy the convenience of our third-party tested gummies, perfect for any routine. Explore our flavors and smash your goals today!